Sunday, March 18, 2012

My Card Sketches

As evidence below will prove, I am not an artist (the
drawing type). But this fact didn't stop me from
trying to draw what I saw in my head.
A few weeks ago, I went to a "Favorite Things
Party" hosted by Jen del Muro. Jen is
one of my very favorite card designers.
She had this super cute banner hanging and it 
caught my eye. Of course I had to know how she
did it! (I will post pics from the party tomorrow).
She is on the design team for Lil' Inkers, and she used
a set from them for the banner.
I looked online for the set right away, but it was sold out!
I was able to get on the email list for restock notification...
Hi Laura!!!
Let me tell you, Lil' Inker's customer service is TOP NOTCH!!!
So, anticipating ordering/receiving the stamp and die set
I had some card designs floating around in my head.
Now, I'm warning you... these sketches are crude.
No judging! I hope you'll forgive me when I post the actual cards! 


If you make anything with these, please send them to me so I can see!


Harry Potter Project

So here is the surprise project I made for my friend Rita J.'s
daughter, Anastasia.She loaned me the Harry Potter movies so
Vincent and I could watch them all together before the last
one was released. Vincent and I really enjoyed them. It was
 bitter-sweet to watch the last one though!
I wanted to return the movies in something special for
Anastasia because she  LOVES Harry Potter
something fierce!

I'm making another one of these boxes for
my niece, Carissa. Who in all honesty is the
absolute biggest Harry Potter fan I know!

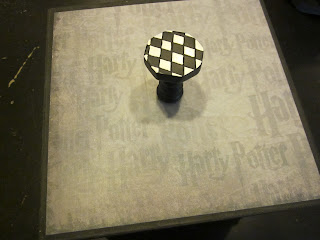
I found this paper mache box at Hobby Lobby
and the knob.

This is the top/lid. The screw that came with it was
way too long. I found this out about 1030 at night and I
was super frustrated! A little trip to Ace Hardware
for a different size screw and I was back on track.


 Side A: I used a Tim Holtz die and an owl from
Stampin' Up I had in my stash.


Side B: I used the TH Christmas lamp post die sans the
holly,the TH Baroche and mini Baroche dies. The quote
I found on Pinterest.
(have i mentioned I'm slightly addicted?)


Side C: TH die key and keyhole. Run thru Cuttlebug
with an embossing folder. I painted it black. After it
dried, I lightly used a silver paint dauber to brush
over it.


Side D: I used the TH spooky tree and chipboard stickers.

I used Ranger's Muti-Matte medium to attatch TH
Foundations tothe box's bottom. Have you used
 this stuff?
Claudine Hellmuth Studio Multi-Medium

Claudine Hellmuth Studio Multi-Medium

The Claudine Hellmuth Studio Multi-Medium – in Matte and Gloss finishes – is an art quality gel medium used for gluing, image transfers, sealing art, creating glazes and extending paints

It has become one of my favorite adhesives.
It is some strong stuff! Those feet aren't
coming off! To glue the paper to the box I
used this... I like it better than Mod Podge!


Inkssentials Glue N' Seal

Inkssentials™ Glue N' Seal

Inkssentials Glue N’ Seal is an all-purpose glue and sealer that is waterproof. Use for decoupage, scrapbooking, card making, collage or any craft project where gluing or a sealing top coat is needed.


Monday, March 12, 2012

Die-Cut Storage

Ok, so here is my storage for my die-cuts...
I needed my die-cuts to be easily portable since I crop mostly
at Scrapper's Boutique. My dies are from My Favorite Things,
The Cat's Pajamas, Paper Tray Ink, and, soon to be Lil' Inker.
These dies are flat steel and I use them in
either my Big Shot or Cuttlebug.

Here is how I started out storing the steel dies. The black folder
is from Hobby Lobby. I used magnetic sheets inside the plastic
folders for the stamp binder. I really liked this at first. Then, my
die collection grew and the folder became to heavy and
lop-sided.
Don't ask me how many times I dropped it...
 I don't want to talk about it. :)

So moving on...
I combined storage ideas from my friends Susan and Rita
(Hi girls! Thanks for the inspiration!).  I found these bags
 also at Hobby Lobby. I have 3... use a coupon! (They come
 with 3 containers, I took them out to use for something
else.) I also grabbed another package of acrylic stamp
folders. I forgot to grab another roll of magnet sheets
though... hmm... guess I'll have to stop by HL again.
SHHH, don't tell my hubby!


Next, I took the folders with the dies on the magnetic
sheets out of the black folder. I have each die-cut labeled
by company and name.
This way makes it easier to:
1. make a list for a class or design work 
2. see which ones I have so I don't get doubles
and
3. have a place for everything and everything
in its place.
Yep, I'm weird like that!


I put the folders in the zebra bag...
Like so...

I have 3... 1 for borders, 1 for things and such, and
1 for my nesties. The black folder has now made it
to the trash since it was falling apart. The next step
is to cut labels for each bag from vinyl with
 my Silhouette.
(Cherie- Please help?)


Here is how Susan stores her die-cuts...

Rita stores hers in the stamp folders...
I combined both ways for
 my storage.

I hope this inspires you... let me know if
you have any questions!

Come by SB this week...
I'll be your sunshine!


Thursday, March 1, 2012

4 Seasons Class


4 Seasons
4 Seasons Class
Instructor: Lynn Demma
Saturday, April 28th
10:30am
Class Fee: $40

We will make these 4 seasonal trees on acrylic
frames. This class will make a great home display
or gift for someone special. To make the tree embellishments,
we will use various die-cuts. I've been wanting to do this class
for quite a while, as I made some for a dear friend of mine.
I just love the whimsical feeling of these trees. I hope you will too!
 
I will teach this class at Scrapper's Boutique.
Please call (817)503-0777 to sign up!

Tuesday, August 9, 2011

Brave Girl Class

Here is a class I'm teaching at Scrapper's Boutique


 Brave Girl Envelope Book Class
Instructor and Designer: Lynn Demma
Saturday, August 13th
10:30am to 3:30pm 
Class Fee: $46.

This class was designed using Crate Paper's "Portrait" Collection and the
Envelope book from Graphic 45.It is full of various die cuts and techniques.
This project was made as a tribute to the Brave Girls Club daily emails.
These emails are uplifting, positive and soul-boosting. The Brave Girls Club was
founded and started by Melody Ross, and her sister Kathy Wilkins in 2009.
Melody Ross was the founder and owner of my all-time favorite paper company,
Chatterbox (which sadly is retired).
This book includes copy-righted quotes from the daily emails
with permission from Kathy Wilkins.
Check out their website! I hope you love it as much as I do.

Feel free to bring a snack, lunch, and a drink!

Student supply list: adhesive (liquid and tape runner),
 paper piercer, scissors, pop dots, tiny attacher, and mini staples,
 irock tool if desired


Some close ups...

Friday, June 10, 2011

GASC Treasures


Better late than never, here's the
treasures I found this year
at the scrapbook convention. As per
tradition, a group of us cropped
all day Wednesday. Denise, Sonia, Stacy,
Trisha, and I cropped, shopped,
 and had lunch together. I'm not sure how
much work we got done,
but there sure was a ton of laughter!
I have already been creating with
some of my new finds.
Look for a tutorial sometime next week
on how we made a pin-cushion
 mannequin in my monthly art group!

Monday, June 6, 2011

GASC


This year for GASC, I had a side-kick. Vincent, my 13 year old,
wanted to tag along with me. I didn't have the heart to say no...
 he wanted to spend time with me and believe me I am eating
 that up with a spoon! Especially as he gets older, I am sure the
last thing he will want to do is go shopping with his mom!


Enjoying a convention tradition...
Maui Wowi -Coconut and banana smoothie!


Here is my little guy doing the make-and-take
at Ten Seconds Studio!


Hard at work...

I better keep an eye on my metal supplies!
Here is a close-up of what Vincent made...

We had a great day shopping with Denise!
Tomorrow I will post a pic of my
new treasures.